Kia Forte: Light bulbs / License plate lamp bulb replacement
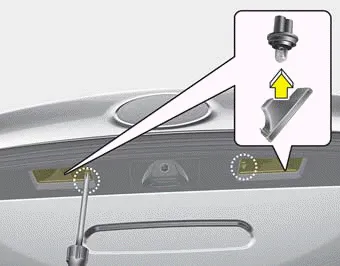
1. Remove the lamp assembly by using a flat-blade screwdriver.
2. Remove the socket from the assembly by turning the socket counterclockwise until the tabs on the socket align with the slots on the assembly.
3. Remove the bulb from bulb-socket by pulling it out.
4. Insert a new bulb by inserting it into the bulb-socket.
5. Install the socket in the assembly by aligning the tabs on the socket with the slots in the assembly. Push the socket into the assembly and turn the socket clockwise.
6. Install the lamp assembly to the body of the vehicle.
1. Open the trunk lid. 2. Remove the socket from the assembly by turning the socket counterclockwise until the tabs on the socket align with the slots on the assembly.
WARNING Prior to working on the Interior lamps, ensure that the “OFF” button is depressed to avoid burning your fingers or receiving an electric shock.
Other information:
Kia Forte 2019-2024 (BD) Owner's Manual: Tire pressure
Always observe the following: Check tire pressure when the tires are cold. (After vehicle has been parked for at least three hours or hasn't been driven more than 1.6 km (one mile) since startup.) Check the pressure of your spare tire each time you check the pressure of other tires.
Kia Forte 2019-2024 (BD) Owner's Manual: Tire rotation
To equalize tread wear, it is recommended that the tires be rotated every 12,000 km (7,500 miles) or sooner if irregular wear develops. During rotation, check the tires for correct balance. When rotating tires, check for uneven wear and damage.
Categories
- Manuals Home
- Kia Forte Owners Manual
- Engine coolant
- Maintenance services
- Check tire pressure
- New on site
- Most important about car
