Kia Forte: What to do in an emergency / Towing
Towing service
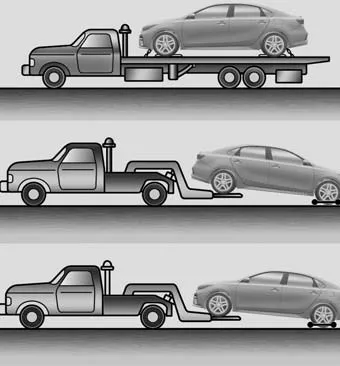
If emergency towing is necessary, we recommend having it done by an authorized Kia dealer or a commercial tow-truck service. Proper lifting and towing procedures are necessary to prevent damage to the vehicle. The use of wheel dollies or flatbed is recommended.
It is acceptable to tow the vehicle with the rear wheels on the ground (without dollies) and the front wheels off the ground.
If any of the loaded wheels or suspension components are damaged or the vehicle is being towed with the front wheels on the ground, use a towing dolly under the front wheels.
When being towed by a commercial tow truck and wheel dollies are not used, the front of the vehicle should always be lifted, not the rear.
✽ NOTICE
If the EPB does not release normally, take your vehicle to an authorized Kia dealer by loading the vehicle on a flatbed tow truck and have the system checked.
WARNING - Side and curtain Air bag
If your vehicle is equipped with side and curtain air bags, set the ignition switch to the LOCK or ACC position when the vehicle is being towed.
The side and curtain air bag may deploy when the ignition is in the ON position, and the rollover sensor detects a rollover situation.
CAUTION - Towing
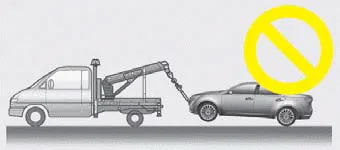
- Do not tow the vehicle backwards with the front wheels on the ground as this may cause damage to the vehicle.
- Do not tow with sling-type equipment. Use wheel lift or flatbed equipment.
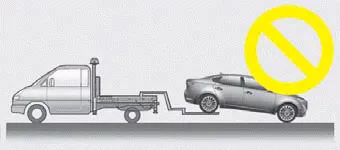
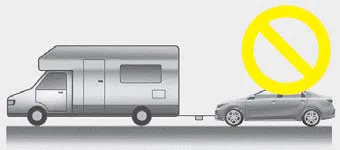
- Do not tow the vehicle with four wheels in contact with the ground if it is a vehicle equipped with DCT or IVT. Otherwise, the transmission will be seriously damaged. Also, make sure not to tow the vehicle connecting it with other vehicles including camper vans.
When towing your vehicle in an emergency without wheel dollies :
1. Set the ignition switch in the ACC position.
2. Place the transmission shift lever in N (Neutral).
3. Release the parking brake.
CAUTION - Towing gear position
Failure to place the transmission shift lever in N (Neutral) may cause internal damage to the transmission.
- For 15/16 inch tire System voltage: DC 12 V Working voltage: DC 10 - 15 V Amperage rating: MAX. 10 ± 1 A (at DC 12V operation) Suitable for use at temperatures: -30 ~ +70°C (-22 ~ +158°F) Max.
■ Front 1. Open the tailgate, and remove the towing hook from the tool case. 2. Remove the hole cover pressing the lower (front) part of the cover on the bumper.
Other information:
Kia Forte 2019-2024 (BD) Owner's Manual: Introduction
With the Tire Mobility Kit (TMK) you stay mobile even after experiencing a tire puncture. The system compressor and sealing compound effectively seal most punctures in a passenger car tire caused by nails or similar objects and reinflates the tire.
Kia Forte 2019-2024 (BD) Owner's Manual: Tire sidewall labeling
This information identifies and describes the fundamental characteristics of the tire and also provides the tire identification number (TIN) for safety standard certification. The TIN can be used to identify the tire in case of a recall.
Categories
- Manuals Home
- Kia Forte Owners Manual
- Fuses
- Your vehicle at a glance
- Maintenance
- New on site
- Most important about car
