Kia Forte: Body Electrical System / Keyless Entry And Burglar Alarm
Specifications
| Specification |
|
Item |
Specification |
|
Power source |
3 V |
|
Operating temperature |
14 - 140°F (-10 - 60°C) |
|
RF Modulation |
FSK |
|
LF Modulation |
ASK |
|
RF frequency |
433.92 MHz |
|
Button number |
3 |
|
Function |
Door lock |
|
Door unlock |
|
|
Trunk unlock |
Components and components location
| Components |
| [4DR] |
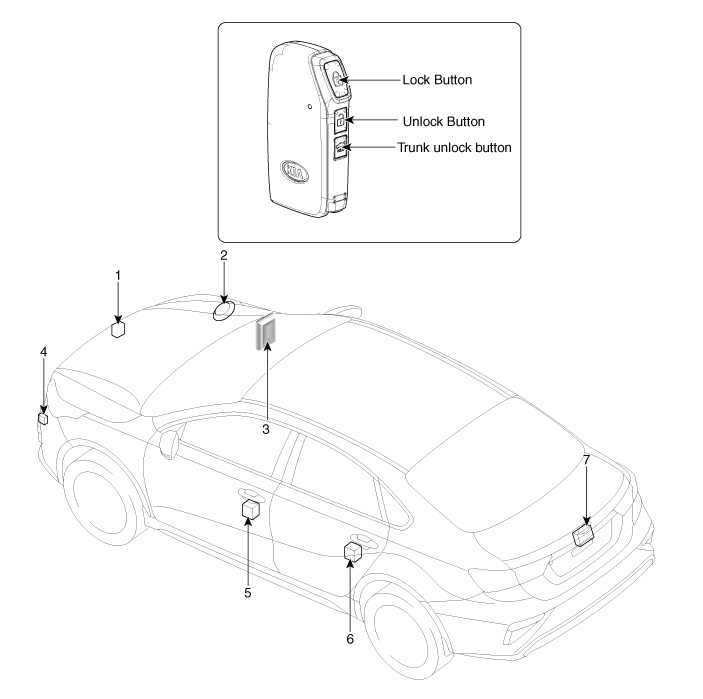
| 1. Hood switch 2. Burglar horn 3. Integrated Body Control Unit (IBU) 4. Door lock / unlock buzzer |
5. Front door actuator & switch
6. Rear door actuator & switch 7. Trunk actuator & switch |
| [5DR] |
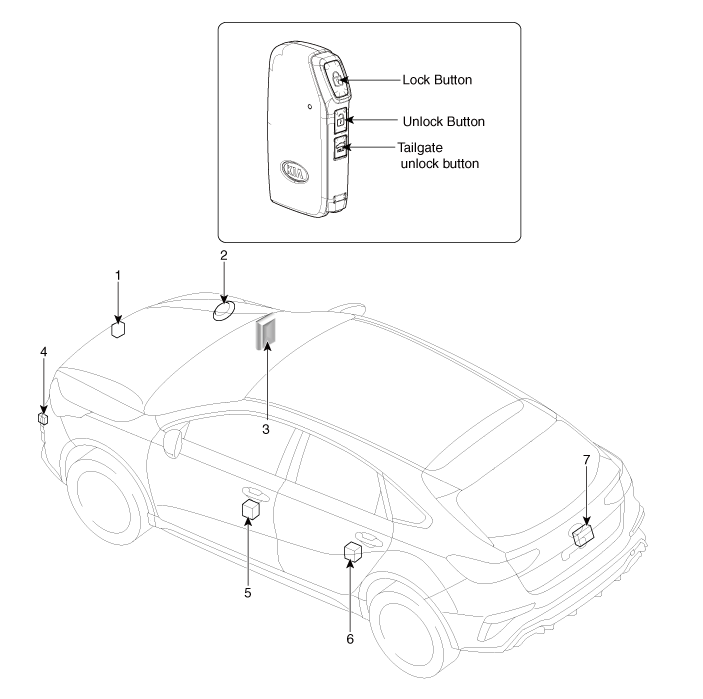
| 1. Hood switch 2. Burglar horn 3. Integrated Body Control Unit (IBU) 4. Door lock / unlock buzzer |
5. Front door actuator & switch
6. Rear door actuator & switch 7. Tatilgate actuator & switch |
Description and operation
| Description |
Burglar Alarm State [B/A State]
|
B/A State |
Description |
||||||||
|
DISARM |
|
||||||||
|
ARMWAIT |
|
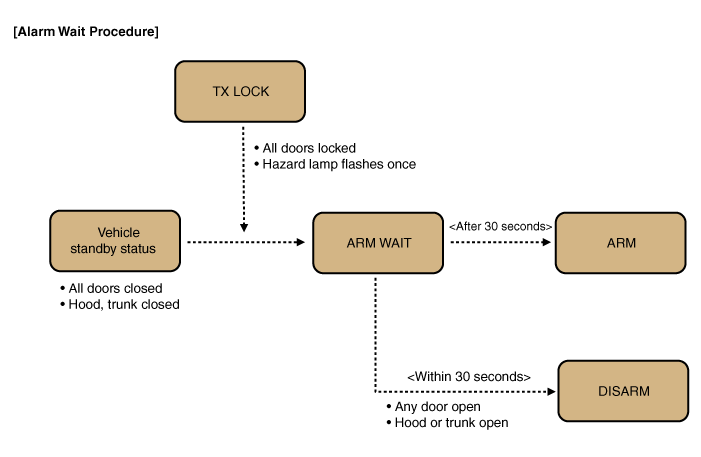
※ Remark: For a vehicle equipped with Smart Key system, the same process is applied to Passive door lock function.
|
B/A State |
Description |
||||||||||||
|
AUTO LOCK TIMER 1 |
|
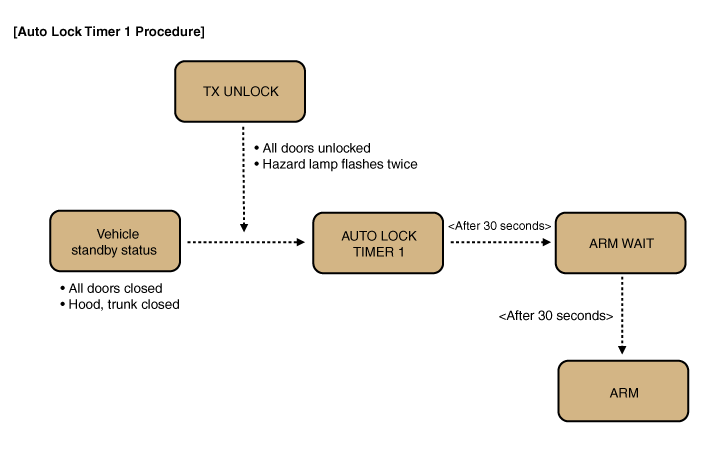
※ Remark: For a vehicle equipped with Smart Key system, the same process is applied to Passive door lock function.
|
B/A State |
Description |
||||||||||
|
AUTO LOCK TIMER 2 |
|
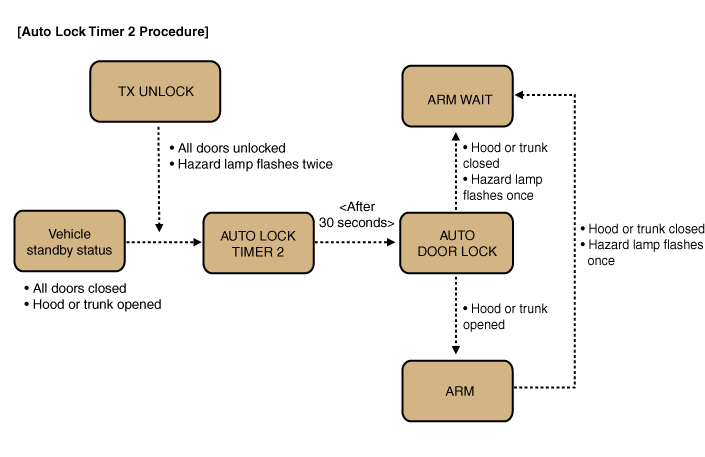
※ Remark: For a vehicle equipped with Smart Key system, the same process is applied to Passive door lock function.
|
B/A State |
Description |
|
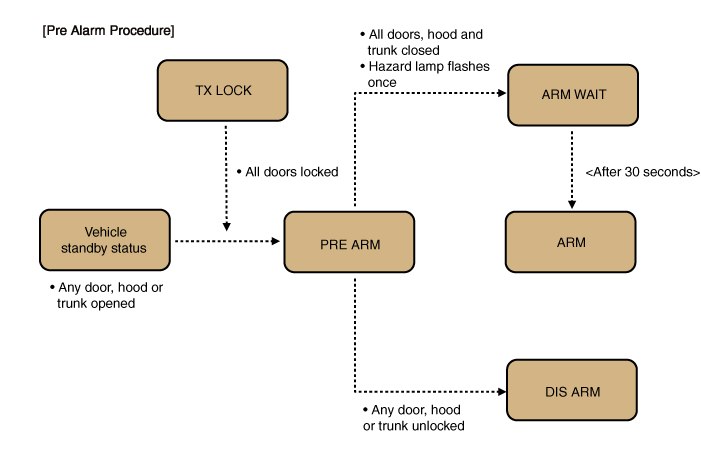
PRE ARM |
1-1. This is the state right before entering "ARM" mode after AUTO LOCK
Timer 2 is completed and all doors are closed. 1-2. If the driver closes hood or trunk, hazard lamp blinks one time and then the vehicle automatically enters "ARM" mode via "ARM WAIT" mode. 2-1. If LOCK button is pressed while at least one of all doors, hood and trunk is open, "PRE ARM" mode turns on. 2-2. Because all doors locking signal is issued but the conditions for "ARM WAIT" are not satisfied, the vehicle remains in standby mode and enters ARM mode via ARM WAIT mode as soon as the door being open is closed. 2-3. In case intrusion is detected in PRE ARM mode, the vehicle turns into DISARM mode. 2-4. Security indicator keeps blinking in PRE ARM mode. |
|
B/A State |
Description |
||||||
|
RE ARM |
|
|
B/A State |
Description |
||||||||||
|
AUTOLOCK TIMER3 |
|

|
B/A State |
Description |
||||||||||||||
|
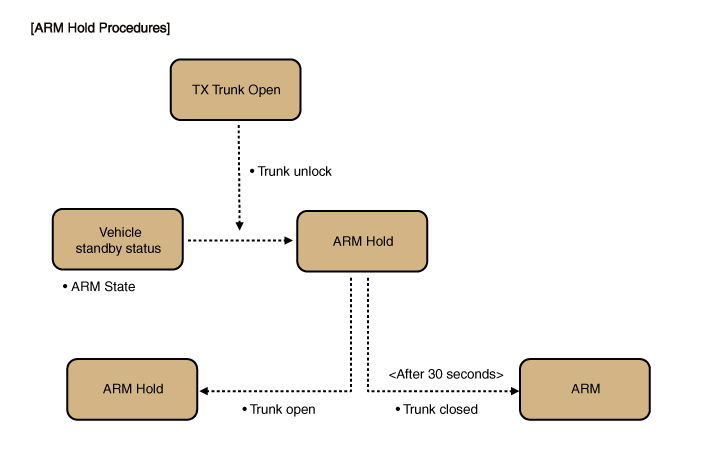
ARM HOLD (Alarm hold : Trunk) ※Non-PTL option |
|
Note 1: ARM HOLD is a mode that defers activation of ARM mode only for trunk. During ARM HOLD mode, ARM mode is applied to doors and hood.
Note 2: When using the ignition key to open the trunk, the ARM HOLD function works in the same way, provided that the "Door Key Burglar Alarm" function should be enabled. if this is disabled, the key-based ARM HOLD is off and using the key to opening the trunk is determined as a theft and the alarm is issued.
|
B/A State |
Description |
||||||
|
RE ARM (ARM mode is on again) |
|
||||||
|
RESET |
|
|
B/A State |
Description |
||||
|
KEY ON 30 second deactivation (Non-Smart Key option) |
|
||||
|
When ARM mode is on, the trunk OPEN and central door unlock are not allowed.
|
|
Repair procedures
| Inspection |
When prying with a flat-tip screwdriver or use a prying trim tool, wrap it with protective tape, and apply protective tape around the related parts, to prevent damage. |

Front Door Lock Module
| 1. |
Remove the front door trim. (Refer to Body - "Front Door Trim") |
| 2. |
Remove the front door module. (Refer to Body - "Front Door Module") |
| 3. |
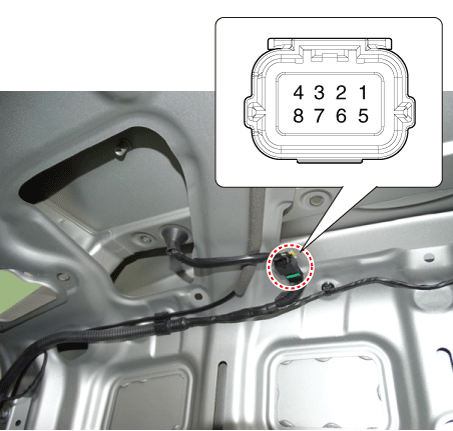
Disconnect the connector from the door lock actuator.
|
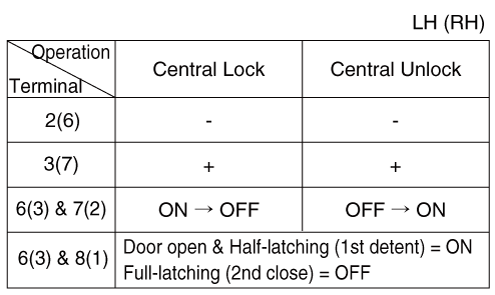
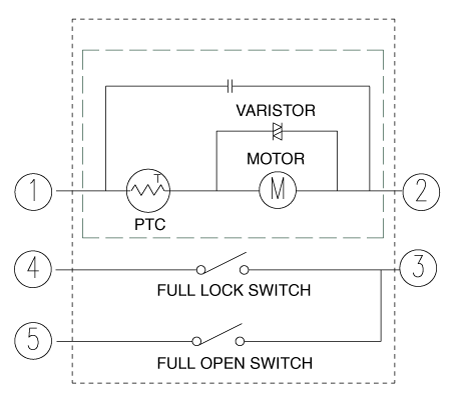
|||||||||||||||||||||||||||||
| 4. |
Check actuator operation by connecting power and ground as shown below. To prevent damage to the actuator, apply battery voltage only momentarily.
|
Rear Door Lock Module
| 1. |
Remove the rear door trim. (Refer to Body - "Rear Door Trim") |
| 2. |
Remove the rear door module. (Refer to Body - "Rear Door Module") |
| 3. |
Disconnect the connector from the door lock actuator
|
|||||||||||||||||||||||||||||
| 4. |
Check actuator operation by connecting power and ground as shown below. To prevent damage to the actuator, apply battery voltage only momentarily.
|
Trunk Lock Module [4DR]
| 1. |
Remove the trunk lid trim. (Refer to Body - "Trunk lid trim") |
| 2. |
Disconnect the connector from the trunk lid latch.
|
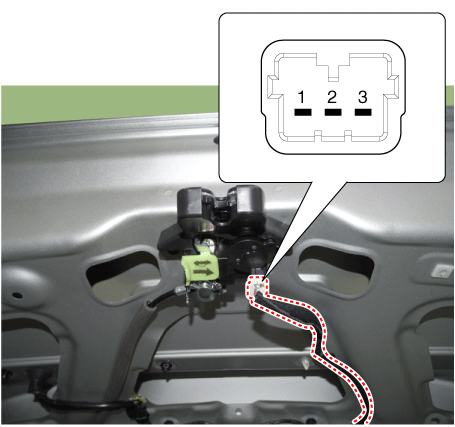
| 3. |
Check actuator operation by connecting power and ground as shown below. To prevent damage to the actuator, apply battery voltage only momentarily.
|
Tailgate Lock Module [5DR]
| 1. |
Remove the tailgate lid trim. (Refer to Tailgate - "Tailgate Trim") |
| 2. |
Disconnect the connector from the tailgate lid latch.
|

| 3. |
Check actuator operation by connecting power and ground as shown below. To prevent damage to the actuator, apply battery voltage only momentarily.
|
Trunk Lid Handle [4DR]
| 1. |
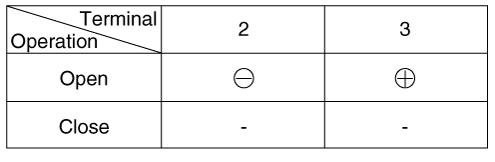
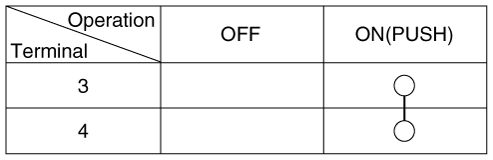
Check for continuity between the terminals.
|
Tailgate Lid Handle [5DR]
| 1. |
Remove the tailgate lid trim. (Refer to Tailgate - "Tailgate Trim") |
| 2. |
Check for continuity between the terminals.
|
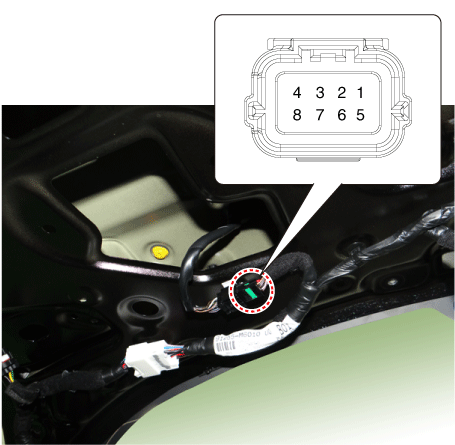

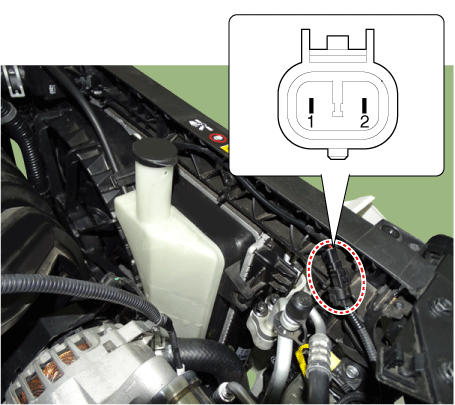
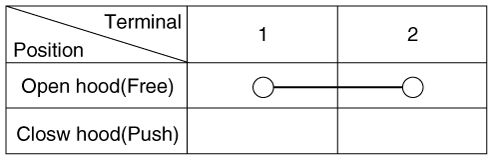
Hood Switch
| 1. |
Check for continuity between the terminals.
|
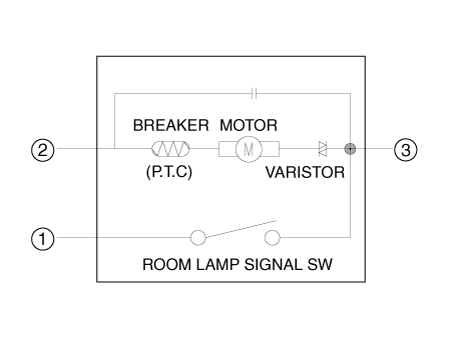
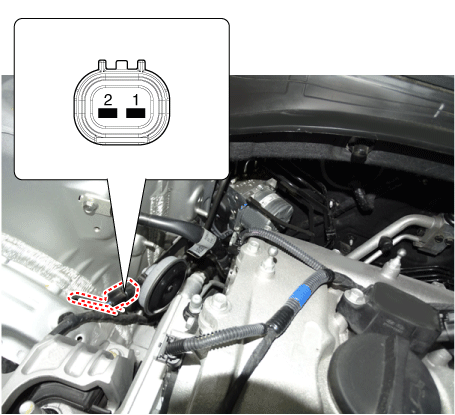
Burglar Horn
| 1. |
Test the burglar horn by connecting battery power to the terminal 2 and ground the terminal 1.
|
| Removal |
Front Door Lock Module
| 1. |
Remove the front door latch. (Refer to Body - "Front Door Latch") |
Rear Door Lock Module
| 1. |
Remove the rear door latch. (Refer to Body - "Rear Door Latch") |
Trunk Lock Module [4DR]
| 1. |
Remove the trunk lid latch. (Refer to Body - "Trunk Lid Latch") |
Tailgate Lock Module [5DR]
| 1. |
Remove the tailgate lid latch. (Refer to Body - "Tailgate Latch") |
Trunk Lid Handle [4DR]
| 1. |
Disconnect the negative (-) battery terminal. |
| 2. |
Remove the trunk lid trim. (Refer to Body - "Trunk Lid Trim") |
| 3. |
Remove the inside rear combination lamp. (Refer to Lighting System - "Rear Combination Lamp") |
| 4. |
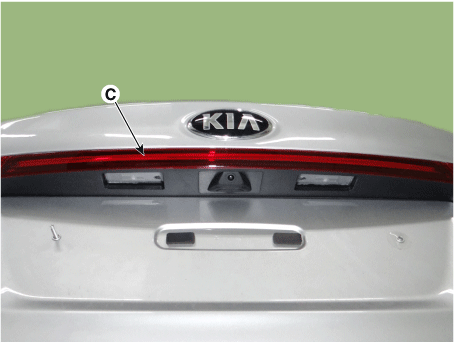
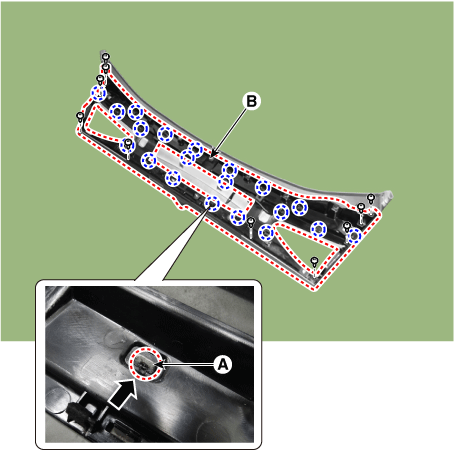
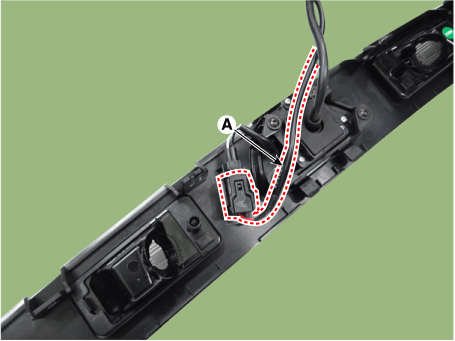
Disconnect the connector (A) and then remove the trunk lid back panel (C) by loosening the nuts (B).
|
| 5. |
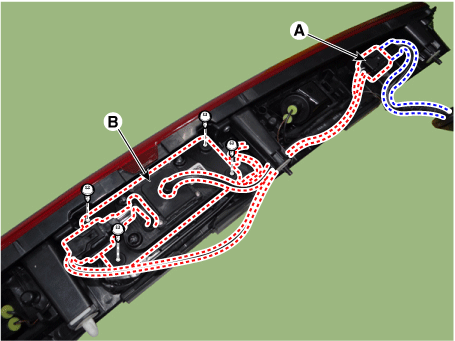
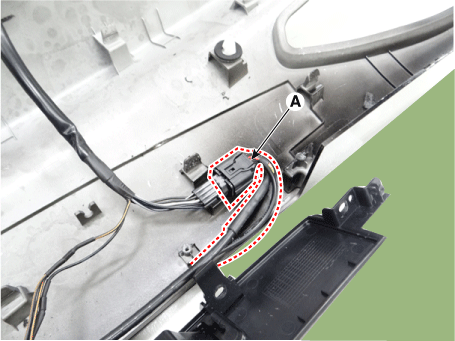
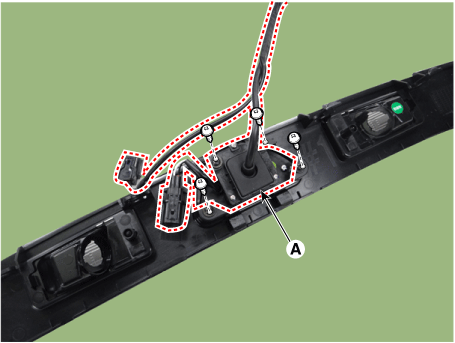
Disconnect the connector (A) and then remove the rear view camera&trunk lid handle assembly (B) after loosening the screws.
|
| 6. |
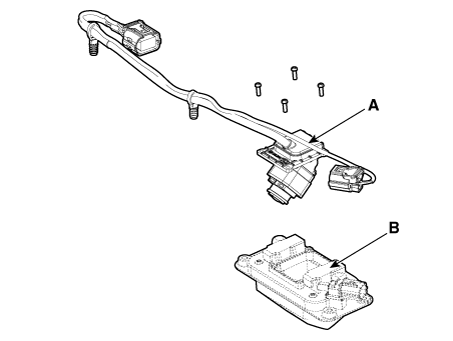
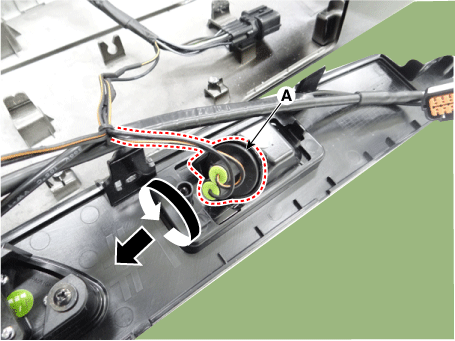
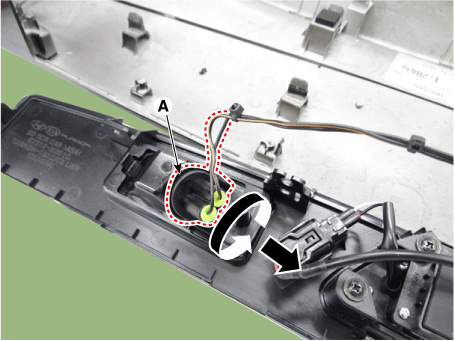
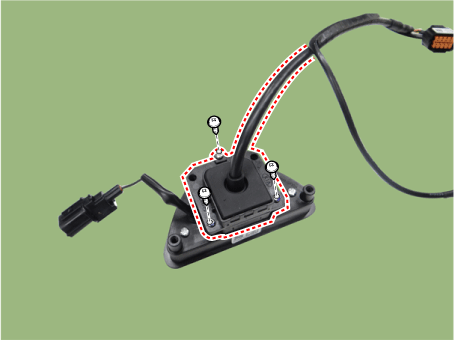
Remove the rear view camera (A) by loosening the screw from the trunk lid handle (B).
|
Tailgate Lid Handle [5DR]
| 1. |
Disconnect the negative battery terminal. |
| 2. |
Remove the tailgate back panel (Refer to Body - "Tailgate Back Panel") |
| 3. |
Loosen the tailgate garnish bracket mounting screws. |
| 4. |
Remove the tailgate garnish bracket (B) by pushing the retaining hooks (A) in the direction of the arrow.
|
| 5. |
Disconnect the rear view camera connector (A).
|
| 6. |
Remove the license plate lamp socket (A) by rotating it in the counterclockwise. [LH]
[RH]
|
| 7. |
Remove the tailgate garnish back panel (A) after loosening the mounting screws.
|

| 8. |
Disconnect the tailgate lid handle connector (A).
|
| 9. |
Remove the rear view camera & tailgate lid handle assembly (A) after loosening the mounting screws.
|
| 10. |
Loosen the rear view camera (A) mounting screws.
|
| 11. |
Remove the rear view camera (A) from the tailgate lid handle (B).
|
Hood Switch
| 1. |
Remove the hood latch. (Refer to Body - "Hood Latch") |
Burglar Horn
| 1. |
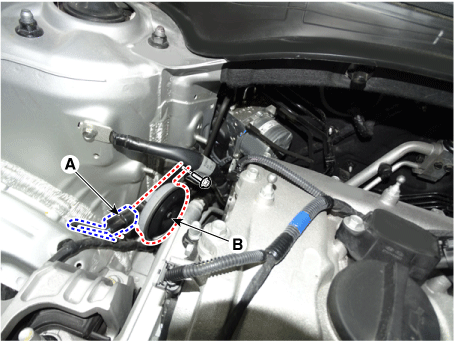
Disconnect the connector (A) and remove the burglar horn (B) by loosening the bolt.
|
| 2. |
Install in the reverse order of removal. |
| Installation |
| 1. |
Install in the reverse order of removal. |
 Integrated Memory Seat (IMS) Switch
Components and components location
Components Location
1. Integrated memory system control
switch assembly
Schematic diagrams
Connector and ...
 Lighting System
Specifications
Specification
Item
Type
Watt
Front
Headlamp
Halogen type
Low
9005HL ...
Other information:
Kia Forte 2019-2025 (BD) Service Manual: Glove Box
Components and components location Component Location 1. Glove box Repair procedures Replacement Put on gloves to prevent hand injuries. ...
Kia Forte 2019-2025 (BD) Owners Manual: Parking brake
Applying the parking brake To engage the parking brake, first apply the foot brake and then pull up the parking brake lever as far as possible. In addition it is recommended that when parking the vehicle on a incline, the shift lever should be in a low gear on manual transmission veh ...
