Kia Forte: Clutch System / Clutch Release Cylinder
Repair procedures
| 1. |
Drain the brake fluid through the bleed plug (A).
|
Do not spill brake fluid on the vehicle; it may damage the paint
if brake fluid does contact the paint, wash it off immediately with
water.
|
|
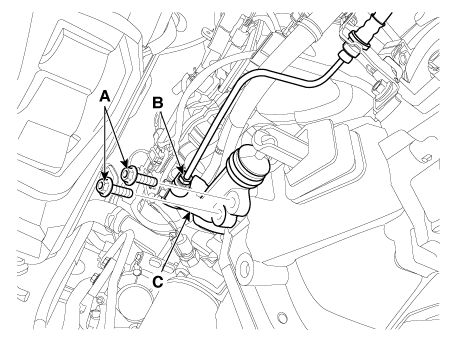
| 2. |
Remove the clutch release cylinder assembly (C) after removing the tube
(B) and bolts (A).
|
Tightening torque :
14.7 - 21.6 N·m (1.5 - 2.2 kgf·m, 10.8 - 15.9 lb·ft)
|
|
| 1. |
To install, reverse the removal procedures.
|
Coat the clutch clevis push rod specified grease.
|
|
Specified grease: CASMOLY L9508
|
|
Clutch Release Cylinder Air Bleeding Procedure
|
Use the specified fluid. Avoid mixing different brands of fluid.
|
|
Specified fluid: SAE J1703 (DOT 3 or DOT 4)
|
| 1. |
After removing cap from the clutch release cylinder air bleeder, insert
a vinyl hose in the plug.
|
| 2. |
Loosening the plug screw, press and release the clutch pedal about 10
times.
|
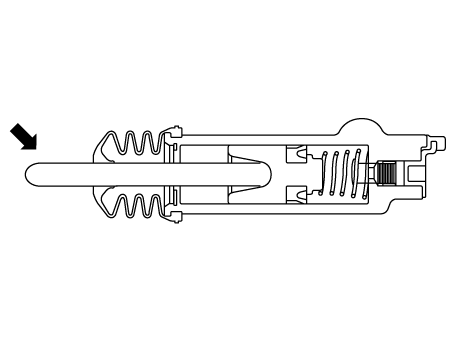
| 3. |
While pressing the clutch pedal, tighten the plug (A). Then, raise the
clutch pedal with hand.
|
| 4. |
After pressing the clutch pedal 3 times or more, loosen the plug (A)
and retighten it with the pedal pressed. Raise it again, then.
|
| 5. |
Repeat the step 4 two or three times (until there is no bubbles in the
fluid).
|
Tightening torque:
7.8 - 13.7 N·m (0.8 - 1.4 kgf·m, 5.8 - 10.1 lb·ft)
|
|
| 6. |
Refill the clutch master cylinder with the specified fluid.
|
Components and components location
Components
[Gasoline 1.6]
1. Clutch pedal assembly
2. Clutch pedal arm
3. Ignition lock & Clutch switch
4 ...
Components and components location
Components
[Gasoline 2.0]
1. Clutch release fork
2. Clutch cover assembly
3. Clutch disk assembly
4. Clutch r ...
Other information:
Ventilation
1.Set the mode to the position.
2.Set the air intake control to the outside
(fresh) air position.
3.Set the temperature control to the
desired position.
4.Set the fan speed control to the
desired speed.
Heating
1.Set the mode to the position.
2.Set the air intake control t ...
Your vehicle may be equipped with
an electronic engine immobilizer
system to reduce the risk of unauthorized
vehicle use.
Your immobilizer system is comprised
of a small transponder in the
ignition key and electronic devices
inside the vehicle.
With the immobilizer system, whenever
y ...


 Clutch Tube
 Clutch Release Fork and Clutch Release Bearing