Kia Forte: Charging System / Wireless Power Charger (WPC)
Specifications
| Specifications |
|
Items |
Specification |
|
Rated voltage |
DC 13.5 V |
|
Operating voltage |
DC 8.5 - 16.0 V |
|
Operating temperature |
-22 to 167 °F (-30 to +75 °C) |
|
Dark current |
MAX. 1 mA |
|
Output power |
5 W |
|
Output frequency |
110 ± 5 kHz |
Description and operation
| Description |
Wireless Power Charger System
During ACC or IG ON, battery voltage is supplied to the wireless power charger system to transmit an output of 5 W to mobile phone.
Mobile phones certified with the wireless charging standard WPC (Qi 1.2.2) or equipped with an exclusive wireless charging case can be used.
Wireless Power Charging System Flow Chart
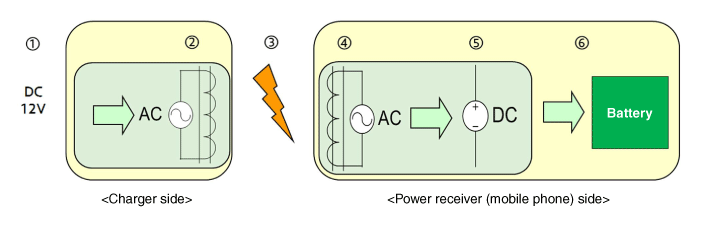
| 1. |
Supply vehicle power. |
| 2. |
Convert to AC. Generate electromagnetic field in 1st coil. |
| 3. |
Generate induced current in power receiver from electromagnetic induction. |
| 4. |
Generate AC in 2nd coil. |
| 5. |
Convert to DC. |
| 6. |
Charge battery. |
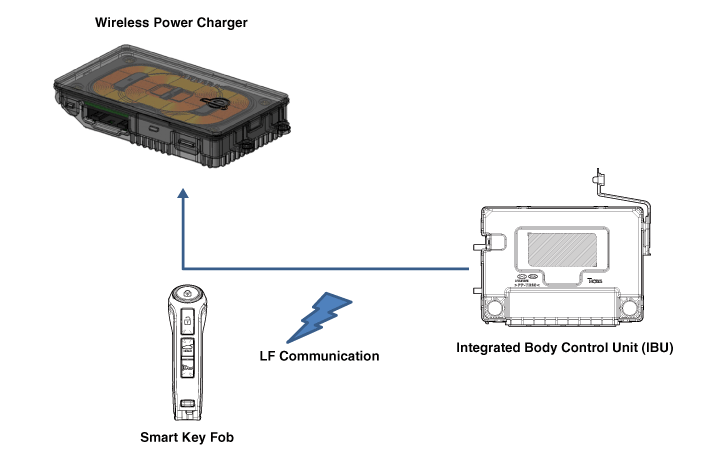
System Configuration Diagram
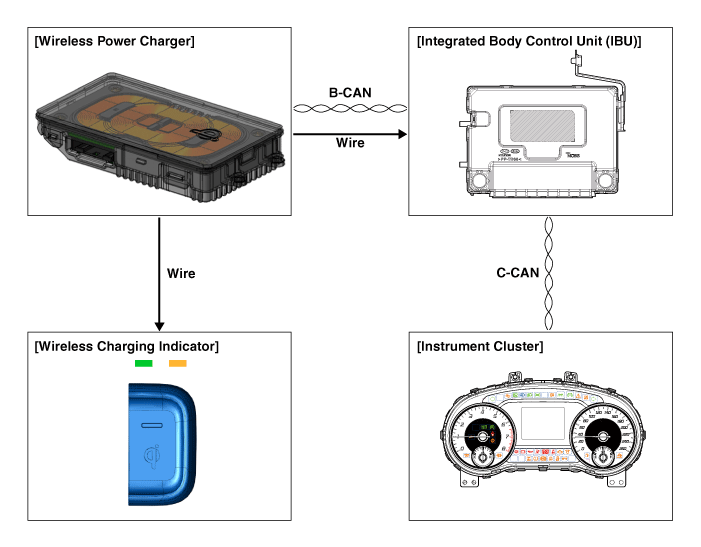
| 1. |
Instrument cluster : Alerts about contact with mobile phone. |
| 2. |
Wireless charging indicator : Displays the charging status. |
| 3. |
Integrated body control unit (IBU) :
|
Major Functions of Wireless Power Charger System
| 1. |
Charging Function
|
||||||||||||||||||||||||||||||||

| 2. |
Mobile phone neglect alert function
|
| 3. |
Overheating prevention
|

| 4. |
Foreign matter detection
|

| 5. |
IBU unit LF frequency interference prevention This function prevents interference between the wireless charging frequency and smart key unit frequency band.
|
| 6. |
Turn the wireless charging function ON/OFF with USM.
※ Trunk applies to RV vehicle models. |
Protection of Wireless Power Charger System
|
Item |
Condition |
Status |
|
Protects against low/high voltage |
Protects and stops charging under 8.5 V and over 16.5 V |
LED OFF (Stops operation) |
|
Charges over 9.0 V and under 16.0 V |
||
|
Protects against reverse voltage |
Protects and stops charging in case of reverse voltage |
LED OFF (Stops operation) |
|
Protects against overcurrent |
Protects and stops charging in case of detecting 4.5 A |
Amber LED blinks |
|
Protects against overheating |
Protects and stops charging in case of detecting 158°F (70°C) by internal
temperature sensor of wireless charging module |
Amber LED blinks |
|
Resumes under 149°F (65°C) |
||
|
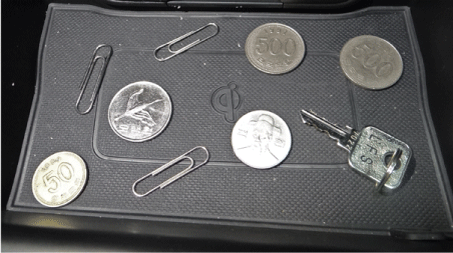
Foreign matter (Coins, clips, precious metals, etc.) |
Protects and stops charging in case of detecting foreign matter (overheating
prevention) |
Amber LED blinks |
|
Prevents frequency interference |
Protects and stops charging by activating SMK in case door or trunk is open
|
LED OFF (Stops operation) |
|
Resumes in 3.5 seconds after all doors and trunk are closed and SMK operation
is completed |
||
|
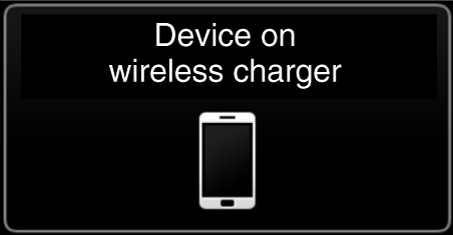
Alert for contact with mobile phone |
In case of smart phone on the charging pad when opening the door after ignition
OFF |
Displays warning message on the instrument panel (for about 4-5 seconds)
|
※ Trunk applies to RV vehicle models.
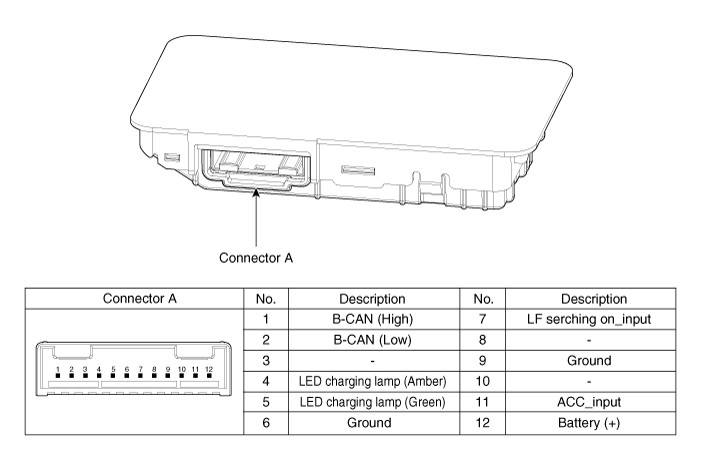
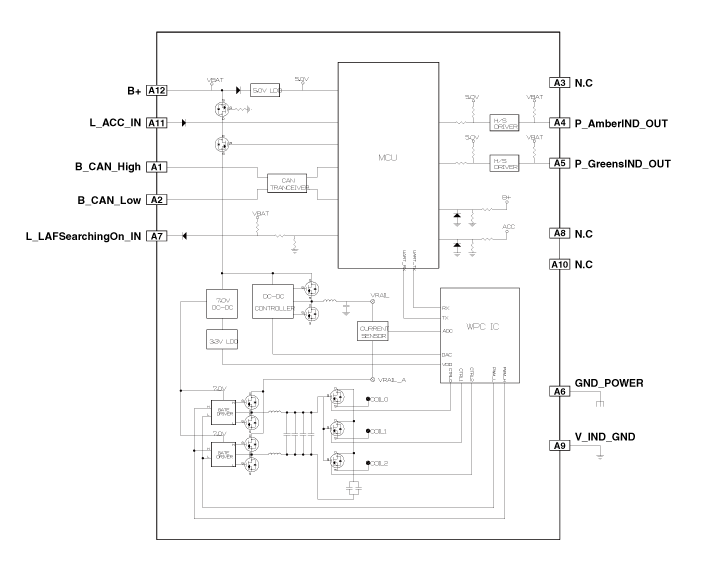
Schematic diagrams
| Connector and Terminal function |
| Schematic Diagram |
Repair procedures
| Removal |
Handling wireless charging system parts by wet hands may cause electric shock. |
|

| 1. |
Disconnect the negative (-) battery terminal. |
| 2. |
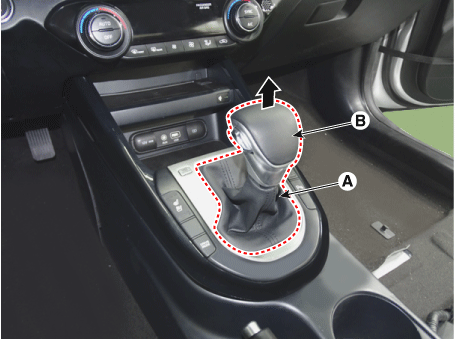
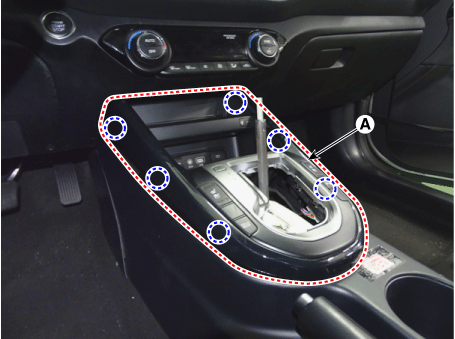
Remove the knob (B) by pulling them in the direction of the arrow after separating the boots (A) from the console upper cover.
|
| 3. |
Remove the console upper cover (A).
|
| 4. |
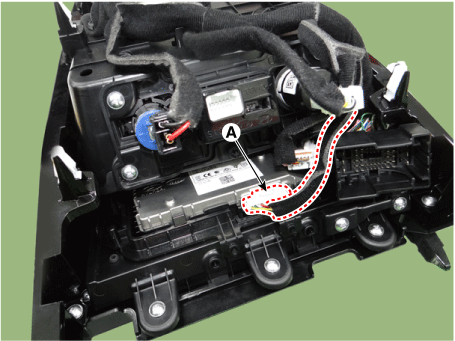
Disconnect the connector (A) from the console upper cover.
|

| 5. |
Disconnect the connector (A) from the wireless power charger.
|
| 6. |
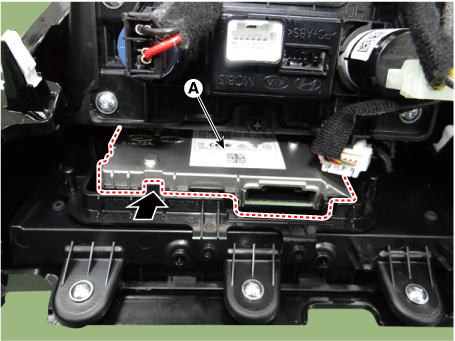
Remove the wireless power charger (A) by pressing the fixing hooks.
|
| Installation |
| 1. |
Install in the reverse order of removal. |
| Inspection |
| 1. |
The body electrical system can be more quickly diagnosed for troubles by using the vehicle diagnostic system (KDS). KDS provides the following information.
|
| 2. |
To diagnose the vehicle by using the diagnostic equipment, select "vehicle model" and "wireless power charger system" to be inspected. |
| 3. |
To inquire the current status of input/output values, select the "Sensor Data" menu The input/output values of the sensors corresponding to the selected module can be checked. |
| 4. |
To perform forced operation of the selected module input, select "Actuation Test". |
| 5. |
To inquire the cause of trouble for each module by self diagnosis, select 'Diagnostic Trouble Code'. |
 Charging System
Components and components location
Components
1. Wireless power charger (WPC)
2. Wireless Charging indicator
3. Front USB charger
4. Rear USB charger
...
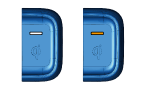
 Wireless Charging Indicator
Specifications
Specifications
Items
Specification
Operating voltage
9 - 16.0 V
Operating temperature
...
Other information:
Kia Forte 2019-2025 (BD) Service Manual: Warning And Caution Labels
General information Warning And Caution Labels 1. Fan caution 2. Radiator cap caution 3. Battery caution Battery Caution Label Warning / Caution Label (Cont'd) A. Keep lighted cigarettes and all other flames or sparks awa ...
Kia Forte 2019-2025 (BD) Owners Manual: Adjusting the height up and down
To raise the headrest, pull it up to the desired position (1). To lower the headrest, push and hold the release button (2) on the headrest support and lower the headrest to the desired position (3). ✽ NOTICE If you recline the seatback towards the front with the headrest and seat ...
