
Kia Forte: Light bulbs / Trunk room lamp replacement
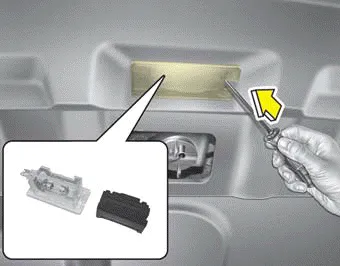
1. Open the trunk lid.
2. Remove the lamp assembly by using a flat-blade screwdriver.
3. Remove the cover from the lamp assembly.
4. Remove the bulb by pulling it straight out.
5. Install a new bulb in the socket.
6. Install the cover to the lamp assembly.
7. Install the lamp assembly to the body of the vehicle.
CAUTION
Be careful not to dirty or damage the lens, lens tab, and plastic housings.
1. Using a flat-blade screwdriver, gently pry the lamp assembly from interior. 2. Remove the bulb by pulling it straight out. 3. Install a new bulb in the socket.
Other information:
Kia Forte 2019-2024 (BD) Owner's Manual: Changing tires
1. Park on a level surface and apply the parking brake firmly. 2. Place the transmission shift lever in P (Park) with Dual clutch transmission/ Intelligent variable transmission and R (Reverse) with manual transmission. 3. Activate the hazard warning flashers.
Kia Forte 2019-2024 (BD) Owner's Manual: Introduction
With the Tire Mobility Kit (TMK) you stay mobile even after experiencing a tire puncture. The system compressor and sealing compound effectively seal most punctures in a passenger car tire caused by nails or similar objects and reinflates the tire.
Categories
- Manuals Home
- Kia Forte Owners Manual
- Owner maintenance
- Maintenance services
- Features of your vehicle
- New on site
- Most important about car
