Kia Forte: Headrest (for front seat) / Removal and installation

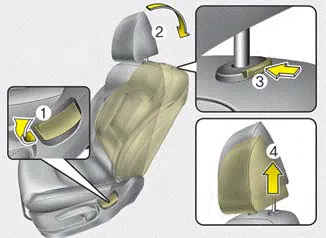
■ Type A
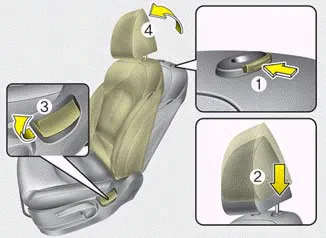
■ Type B
To remove the headrest:
1. Recline the seatback (2) with the recline lever or switch (1).
2. Raise headrest as far as it can go.
3. Press the headrest release button (3) while pulling the headrest up (4).
WARNING - Headrest Removal
NEVER allow anyone to ride in a seat with the headrest removed. Headrests can provide critical neck and head support in a crash.

■ Type A
■ Type B
To reinstall the headrest :
1. Put the headrest poles (2) into the holes while pressing the release button or switch (1).
2. Recline the seatback (4) with the lever or switch (3).
3. Adjust the headrest to the appropriate height.
WARNING - Headrest Reinstallation
To reduce the risk of injury to the head or neck, always make sure the head rest is locked into position and adjusted properly after reinstalling.
To raise the headrest, pull it up to the desired position (1). To lower the headrest, push and hold the release button (2) on the headrest support and lower the headrest to the desired position (3).
The seatback pocket is provided on the back of the front passenger’s seatback. WARNING - Seatback pocket Do not put heavy or sharp objects in the seatback pocket.
Other information:
Kia Forte 2019-2024 (BD) Owner's Manual: Side marker bulb replacement (Headlamp Type A,B)
1. Open the hood. 2. Remove the bulb-socket from the headlamp assembly by turning the bulb-socket counterclockwise until the tabs on the bulb-socket align with the slots on the headlamp assembly. 3. Remove the bulb from the bulbsocket by pulling it out.
Kia Forte 2019-2024 (BD) Owner's Manual: Recommended lubricants and capacities
To help achieve proper engine and powertrain performance and durability, use only lubricants of the proper quality. The correct lubricants also help promote engine efficiency that results in improved fuel economy. These lubricants and fluids are recommended for use in your vehicle.
Categories
- Manuals Home
- Kia Forte Owners Manual
- Trunk
- Specifications & Consumer information
- Owner maintenance
- New on site
- Most important about car
