Kia Forte: Heating and air conditioning / Mode selection
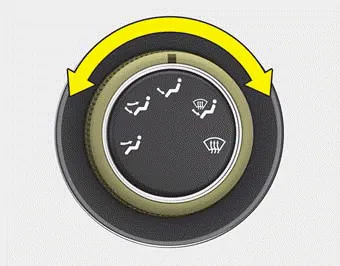
The mode selection knob controls the direction of the air flow through the ventilation system.
Air can be directed to the floor, dashboard outlets, or windshield. Five symbols are used to represent Face, Bi-Level, Floor, Floor-Defrost and Defrost air position.
Face-Level (B, D, F)

Air flow is directed toward the upper body and face. Additionally, each outlet can be controlled to direct the air discharged from the outlet.
Bi-Level (B, D, C, E, F)

Air flow is directed towards the face and the floor.
Floor-Level (C, E, A, D, F)

Most of the air flow is directed to the floor, with a small amount of the air being directed to the windshield and side window defrosters.
Floor/Defrost-Level (A, C, D, E, F)

Most of the air flow is directed to the floor and the windshield with a small amount directed to the side window defrosters.
Defrost-Level (A, D)

Most of the air flow is directed to the windshield with a small amount of air directed to the side window defrosters.
1. Start the engine. 2. Set the mode to the desired position. For improving the effectiveness of heating and cooling; - Heating: - Cooling: 3.
The MAX A/C mode is used to cool the inside of the vehicle faster. Air flow is directed toward the upper body and face. In this mode, the air conditioning and the recirculated air position will be selected automatically.
Other information:
Kia Forte 2019-2024 (BD) Owner's Manual: Engine coolant
The high-pressure cooling system has a reservoir filled with year round antifreeze coolant. The reservoir is filled at the factory. Check the antifreeze protection and coolant level at least once a year: at the beginning of the winter season, and before traveling to a colder climate.
Kia Forte 2019-2024 (BD) Owner's Manual: Driver’s side fuse panel
Inside the fuse/relay panel covers, you can find the fuse/relay label describing fuse/relay name and capacity. ✽ NOTICE Not all fuse panel descriptions in this manual may be applicable to your vehicle. It is accurate at the time of printing.
Categories
- Manuals Home
- Kia Forte Owners Manual
- Fuses
- Normal Maintenance Schedule - Turbo Models
- Engine coolant
- New on site
- Most important about car
