Kia Forte: Light bulbs / License plate lamp bulb replacement
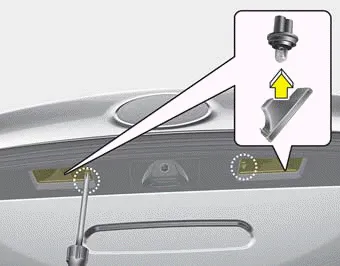
1. Remove the lamp assembly by using a flat-blade screwdriver.
2. Remove the socket from the assembly by turning the socket counterclockwise until the tabs on the socket align with the slots on the assembly.
3. Remove the bulb from bulb-socket by pulling it out.
4. Insert a new bulb by inserting it into the bulb-socket.
5. Install the socket in the assembly by aligning the tabs on the socket with the slots in the assembly. Push the socket into the assembly and turn the socket clockwise.
6. Install the lamp assembly to the body of the vehicle.
1. Open the trunk lid. 2. Remove the socket from the assembly by turning the socket counterclockwise until the tabs on the socket align with the slots on the assembly.
WARNING Prior to working on the Interior lamps, ensure that the “OFF” button is depressed to avoid burning your fingers or receiving an electric shock.
Other information:
Kia Forte 2019-2024 (BD) Owner's Manual: Jack label
1. Model Name 2. Maximum allowable load 3. When using the jack, set your parking brake. 4. When using the jack, stop the engine. 5. Do not get under a vehicle that is supported by a jack. 6. The designated locations under the frame 7.
Kia Forte 2019-2024 (BD) Owner's Manual: Climate control air filter
Filter inspection The climate control air filter should be replaced according to the Maintenance Schedule. If the vehicle is operated in severely air-polluted cities or on dusty rough roads for a long period, it should be inspected more frequently and replaced earlier.
Categories
- Manuals Home
- Kia Forte Owners Manual
- Engine coolant
- Recommended lubricants and capacities
- Blade replacement
- New on site
- Most important about car
