Kia Forte: Engine Control System / Engine Control Module (ECM)
Schematic diagrams
| ECM Terminal And Input/Output signal |
| ECM Terminal Function |
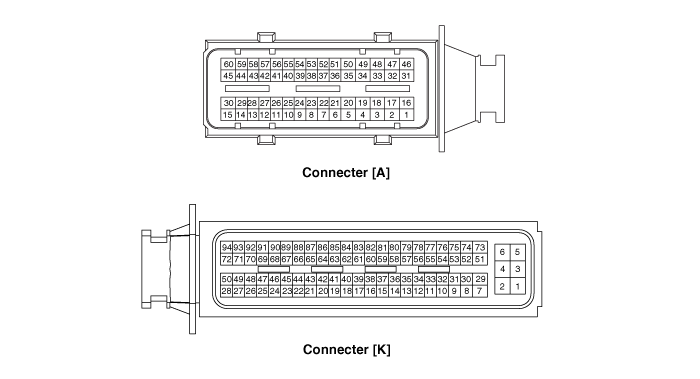
Connector [A]
|
Pin No. |
Description |
Connected to |
|
1 |
Ignition coil (Cylinder #4) control output |
Ignition coil (Cylinder #4) |
|
2 |
Ignition coil (Cylinder #3) control output |
Ignition coil (Cylinder #3) |
|
3 |
- |
|
|
4 |
- |
|
|
5 |
Injector (Cylinder #3) [Low] control output |
Injector (Cylinder #3) |
|
6 |
- |
|
|
7 |
Engine Coolant Temperature Sensor (ECTS) signal input |
Engine Coolant Temperature Sensor (ECTS) |
|
8 |
- |
|
|
9 |
Boost Pressure Sensor (BPS) signal input |
Boost Pressure Sensor (BPS) |
|
10 |
- |
|
|
11 |
- |
|
|
12 |
- |
|
|
13 |
Throttle Position Sensor (TPS) 1 signal input |
Throttle position sensor (TPS) #1 [ETC module] |
|
14 |
Accelerator Position Sensor (APS) 1 signal input |
Accelerator Position Sensor (APS) |
|
15 |
- |
|
|
16 |
Ignition coil (Cylinder #2) control output |
Ignition coil (Cylinder #2) |
|
17 |
Ignition coil (Cylinder #1) control output |
Ignition coil (Cylinder #1) |
|
18 |
ETC motor [+] control output |
ETC Module |
|
19 |
- |
|
|
20 |
Injector (Cylinder #2) [Low] control output |
Injector (Cylinder #2) |
|
21 |
Wiper switch signal input |
Wiper Relay |
|
22 |
- |
|
|
23 |
- |
|
|
24 |
Camshaft Position Sensor (CMPS) [Bank 1/Exhaust] signal input |
Camshaft Position Sensor (CMPS) [Bank 1/Exhaust] |
|
25 |
- |
|
|
26 |
Vehicle speed signal input |
ABS/ESP Control Unit |
|
27 |
Start signal input |
Ignition Switch |
|
28 |
Brake Test switch signal input |
Brake Switch |
|
29 |
Brake Light switch signal input |
Brake Switch |
|
30 |
- |
|
|
31 |
Injector (Cylinder #2) [High] control output |
Injector (Cylinder #2) |
|
32 |
Injector (Cylinder #3) [High] control output |
Injector (Cylinder #3) |
|
33 |
- |
|
|
34 |
Injector (Cylinder #1) [Low] control output |
Injector (Cylinder #1) |
|
35 |
Fuel Pressure Control Valve (FPCV) [High] control output |
Fuel Pressure Control Valve (FPCV) |
|
36 |
Sensor ground |
Camshaft Position Sensor (CMPS) [Bank 1/Intake] |
|
37 |
Sensor ground |
Camshaft Position Sensor (CMPS) [Bank 1/Exhaust] |
|
38 |
Alternator PWM signal output |
Alternator |
|
39 |
- |
|
|
40 |
- |
|
|
41 |
Heated Oxygen Sensor (HO2S) [Bank 1/Sensor 2] signal input |
Heated Oxygen Sensor (HO2S) [Bank 1/Sensor 2] |
|
42 |
- |
|
|
43 |
- |
|
|
44 |
- |
|
|
45 |
Electric load signal input [Defrost] |
Alternator |
|
46 |
Injector (Cylinder #4) [High] control output |
Injector (Cylinder #4) |
|
47 |
Injector (Cylinder #1) [High] control output |
Injector (Cylinder #1) |
|
48 |
ETC motor [-] control output |
ETC Module |
|
49 |
Injector (Cylinder #4) [Low] control output |
Injector (Cylinder #4) |
|
50 |
Fuel Pressure Control Valve (FPCV) [Low] control output |
Fuel Pressure Control Valve (FPCV) |
|
51 |
- |
|
|
52 |
- |
|
|
53 |
Sensor ground |
Crankshaft Position Sensor (CKPS) |
|
54 |
Crankshaft Position Sensor (CKPS) [B] signal input |
Crankshaft Position Sensor (CKPS) |
|
55 |
- |
|
|
56 |
Camshaft Position Sensor (CMPS) [Bank 1/Intake] signal input |
Camshaft Position Sensor (CMPS) [Bank 1/Intake] |
|
57 |
Sensor ground |
Heated Oxygen Sensor (HO2S) [Bank 1/Sensor 2] |
|
58 |
- |
|
|
59 |
- |
|
|
60 |
- |
|
Connector [K]
|
Pin No. |
Description |
Connected to |
|
1 |
ECM ground |
Chassis Ground |
|
2 |
ECM ground |
Chassis Ground |
|
3 |
ECM ground |
Chassis Ground |
|
4 |
Battery power (B+) |
Battery |
|
5 |
Battery power (B+) |
Battery |
|
6 |
Battery power (B+) |
Main Relay |
|
7 |
Battery power (B+) |
Main Relay |
|
8 |
Sensor ground |
Accelerator Position Sensor (APS) #1 |
|
9 |
Sensor ground |
Manifold Absolute Pressure Sensor (MAPS) |
|
10 |
Sensor ground |
Boost Pressure Sensor (BPS) |
|
11 |
- |
|
|
12 |
- |
|
|
13 |
- |
|
|
14 |
- |
|
|
15 |
- |
|
|
16 |
Sensor ground |
Engine Coolant Temperature Sensor (ECTS) |
|
17 |
- |
|
|
18 |
- |
|
|
19 |
Waste Gate Solenoid Valve (WGV) control output |
Waste Gate Solenoid Valve (WGV) |
|
20 |
- |
|
|
21 |
- |
|
|
22 |
CVVT Oil Control Valve (OCV) [Bank 1/Intake] control output |
CVVT Oil Control Valve (OCV) [Bank 1/Intake] |
|
23 |
- |
|
|
24 |
Cooling fan PWM control output |
Cooling Fan Relay |
|
25 |
- |
|
|
26 |
- |
|
|
27 |
Fuel pump relay control output (With Immobilizer/Smart key) |
Fuel Pump Relay |
|
28 |
- |
|
|
29 |
Ignition switch signal input |
Ignition switch |
|
30 |
Sensor ground |
Accelerator Position Sensor (APS) #2 |
|
31 |
- |
|
|
32 |
- |
|
|
33 |
- |
|
|
34 |
- |
|
|
35 |
- |
|
|
36 |
Sensor ground |
Rail Pressure Sensor (RPS) |
|
37 |
Sensor ground |
A/C Pressure Transducer (APT) |
|
38 |
- |
|
|
39 |
Alternator COM signal output |
Alternator |
|
40 |
- |
|
|
41 |
Start relay control output |
Start Relay |
|
42 |
- |
|
|
43 |
Sensor power (+5V) |
Accelerator Position Sensor (APS) #2 |
|
44 |
Sensor power (+5V) |
Camshaft Position Sensor (CMPS) |
|
45 |
- |
|
|
46 |
- |
|
|
47 |
- |
|
|
48 |
- |
|
|
49 |
- |
|
|
50 |
CVVT Oil Control Valve (OCV) [Bank 1/Exhaust] control output |
CVVT Oil Control Valve (OCV) [Bank 1/Exhaust] |
|
51 |
Main relay control output |
Main Relay |
|
52 |
Sensor ground |
Throttle position sensor (TPS) #1,2 [ETC module] |
|
53 |
Blower Switch MAX. signal input |
Heater & A/C Control module |
|
54 |
A/C Pressure Transducer (APT) signal input |
A/C Pressure Transducer (APT) |
|
55 |
- |
|
|
56 |
Intake Temperature Sensor (IATS) signal input |
Intake Temperature Sensor (IATS) |
|
57 |
Manifold Absolute Pressure Sensor (MAPS) signal input |
Manifold Absolute Pressure Sensor (MAPS) |
|
58 |
Sensor ground |
Knock Sensor (KS) |
|
59 |
VS+ (NERNST Cell Voltage) |
Heated Oxygen Sensor (HO2S) [Bank 1/Sensor 1] |
|
60 |
Rc (Compensative Resistance) |
Heated Oxygen Sensor (HO2S) [Bank 1/Sensor 1] |
|
61 |
LIN communication signal input |
Battery Sensor |
|
62 |
CCP-CAN [Low] |
Other control module, Data Link Connector (DLC) |
|
63 |
C-CAN [Low] |
Other control module, Data Link Connector (DLC) |
|
64 |
- |
|
|
65 |
- |
|
|
66 |
Sensor power (+5V) |
Accelerator Position Sensor (APS) #1 |
|
67 |
- |
|
|
68 |
RCV control solenoid valve control output |
RCV control solenoid valve |
|
69 |
- |
|
|
70 |
- |
|
|
71 |
Fuel pump relay control output (W/O Immobilizer/Smart key) |
Fuel Pump Relay |
|
72 |
- |
|
|
73 |
- |
|
|
74 |
Throttle Position Sensor (TPS) 2 signal input |
Throttle position sensor (TPS) #1,2 [ETC module] |
|
75 |
- |
|
|
76 |
Fuel Level Sensor (FLS) signal input |
Fuel Level Sensor (FLS) |
|
77 |
Accelerator Position Sensor (APS) 2 signal input |
Accelerator Position Sensor (APS) #2 |
|
78 |
Rail Pressure Sensor (RPS) signal input |
Rail Pressure Sensor (RPS) |
|
79 |
Knock Sensor (KS) signal input |
Knock Sensor (KS) |
|
80 |
VS-/IP- (Common Ground for VS, IP) |
Heated Oxygen Sensor (HO2S) [Bank 1/Sensor 1] |
|
81 |
Rc/Rp (Pump Cell Voltage) |
Heated Oxygen Sensor (HO2S) [Bank 1/Sensor 1] |
|
82 |
Engine speed signal output |
Power Distribution Module (PDM) |
|
83 |
Immobilizer communication line |
Immobilizer control module |
|
84 |
CCP-CAN [High] |
Other control module, Data Link Connector (DLC) |
|
85 |
C-CAN [High] |
Other control module, Data Link Connector (DLC) |
|
86 |
Sensor power (+5V) |
Manifold Absolute Pressure Sensor (MAPS) |
|
87 |
Sensor power (+5V) |
Rail Pressure Sensor (RPS) |
|
A/C Pressure Transducer (APT) |
||
|
Boost Pressure Sensor (BPS) |
||
|
88 |
Sensor power (+5V) |
Throttle position sensor (TPS) #1,2 [ETC module] |
|
89 |
Heated Oxygen Sensor (HO2S) [Bank 1/Sensor 1] heater control output |
Heated Oxygen Sensor (HO2S) [Bank 1/Sensor 1] |
|
90 |
- |
|
|
91 |
Heated Oxygen Sensor (HO2S) [Bank 1/Sensor 2] heater control output |
Heated Oxygen Sensor (HO2S) [Bank 1/Sensor 2] |
|
92 |
- |
|
|
93 |
- |
|
|
94 |
Purge Control Solenoid Valve (PCSV) control output |
Purge Control Solenoid Valve (PCSV) |
Repair procedures
| Removal and Installation |
| 1. |
Turn ignition switch OFF and disconnect the battery negative (-) terminal. |
| 2. |
Remove the battery. (Refer to Engine Electrical System - "Battery") |
| 3. |
Disconnect the ECM connector (A). |
| 4. |
Remove the mounting bolts and nut, and then remove the ECM bracket assembly (B).
|
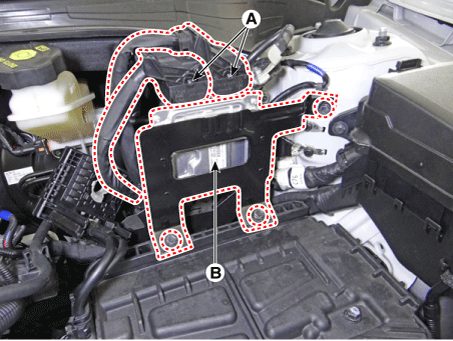
| 5. |
Remove the ECM (B) after loosening the mounting nuts (A) from the bracket.
|

| 6. |
Install in the reverse order of removal. |
| ECM Problem Inspection Procedure |
| 1. |
TEST ECM GROUND CIRCUIT: Measure resistance between ECM and chassis ground using the backside of ECM harness connector as ECM side check point. If the problem is found, repair it.
|
| 2. |
TEST ECM CONNECTOR: Disconnect the ECM connector and visually check the ground terminals on ECM side and harness side for bent pins or poor contact pressure. If the problem is found, repair it. |
| 3. |
If problem is not found in Step 1 and 2, the ECM could be faulty. If so, make sure there were no DTC's before swapping the ECM with a new one, and then check the vehicle again. If DTC's were found, examine this first before swapping ECM. |
| 4. |
RE-TEST THE ORIGINAL ECM: Install the original ECM (may be broken) into a known-good vehicle and check the vehicle. If the problem occurs again, replace the original ECM with a new one. If problem does not occur, this is intermittent problem (Refer to “Intermittent Problem Inspection Procedure” in Basic Inspection Procedure). |
| Adjustment |
ECM Neutral Mode procedure (With Immobilizer)
| • |
After replacing the ECM of the vehicle with the immobilizer, the following procedure must be performed. |
|
[If installing a used ECM] |
| 1) |
Perform "ECM Neutral Mode" procedure using KDS. (Refer to Body Electrical System - "Smart Key System") |
| 2) |
After finishing "ECM Neutral Mode", perform "Key Teaching" procedure using KDS. (Refer to "Body Electrical System - "Smart Key") |
|
[If installing a new ECM] Perform "Key Teaching" procedure using KDS. (Refer to "Body Electrical System - "Smart Key") |
ECM Neutral Mode procedure (With Smart key)
| • |
After replacing the ECM of the vehicle with the smart key system (button start), the following procedure must be performed. |
|
[If installing a used ECM] |
| 1) |
Perform "ECM Neutral Mode" procedure using KDS. (Refer to Body Electrical System - "Smart Key System") |
| 2) |
After finishing "ECM Neutral Mode", turn IGN ON then OFF using the smart key or start button. Then the ECM learns information on the smart key automatically. (Refer to "Body Electrical System - "Smart Key") |
|
[If installing a new ECM] Turn IGN ON then OFF using the smart key or start button. Then the ECM learns information on the smart key automatically. (Refer to "Body Electrical System - "Smart Key") |
ETC module learning procedure
Perform ETC module learning after replacing the ETC module.
(Refer to Electronic Throttle Control System - "Adjustment")
VIN programming procedure
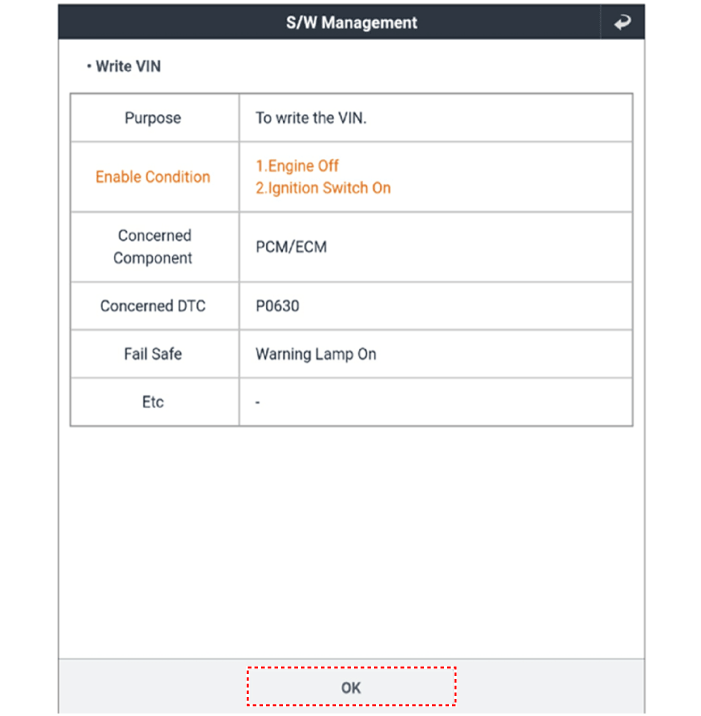
VIN (Vehicle Identification Number) is a number that has the vehicle's information (Maker, Vehicle Type, Vehicle Line/Series, Body Type, Engine Type, Transmission Type, Model Year, Plant Location and so forth. For more information, please refer to the group "GI" in this SERVICE MANUAL). When replacing an ECM, the VIN must be programmed in the ECM. If there is no VIN in ECM memory, the fault code (DTC P0630) is set.
The programmed VIN cannot be changed. When writing the VIN, confirm the VIN carefully. |

| 1. |
Turn the ignition switch OFF. |
| 2. |
Connect the KDS to Data Link Connector (DLC). |
| 3. |
Turn the igntion switch ON. |
| 4. |
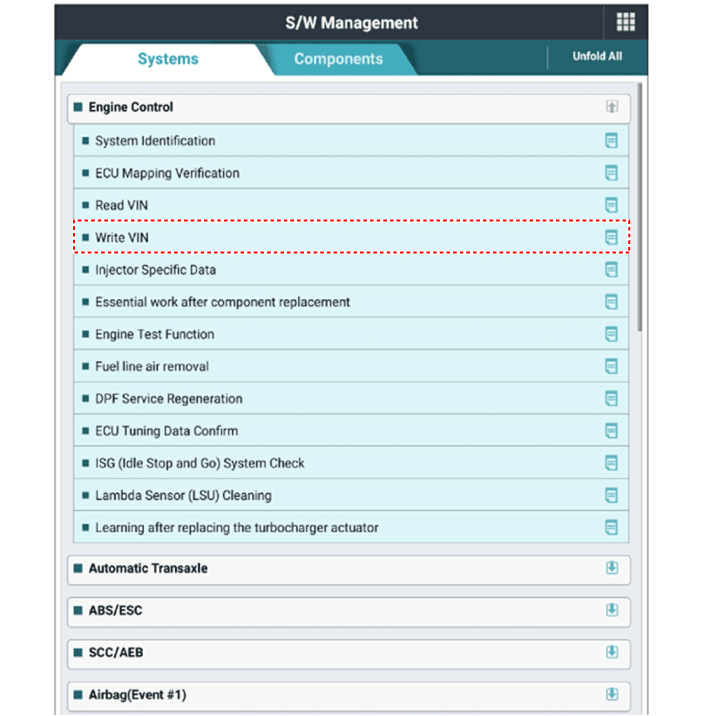
Select "Vehicle, Model Year, Engine, System". |
| 5. |
Select "Vehicle S/W Management". |
| 6. |
Select "Write VIN".
|

 Engine Control System
Components and components location
Components Location
1. Engine Control Module (ECM)
2. Manifold Absolute Pressure Sensor (MAPS)
3. Intake Air Temperature Sensor ...
 ETC (Electronic Throttle Control) System
Specifications
Specification
Throttle angle(°)
Output Voltage (V)
TPS1
TPS2
0
0.5
4.5
...
Other information:
Kia Forte 2019-2025 (BD) Service Manual: Sunroof Assembly
Components and components location Components Location 1. Sunroof assembly Repair procedures Replacement • When removing with a flat - tip scre ...
Kia Forte 2019-2025 (BD) Service Manual: Air Conditioning System
General safety information and caution Instructions (R-134a) When Handling Refrigerant 1. R-134a liquid refrigerant is highly volatile. A drop on the skin of your hand could result in localized frostbite. When handling the refrigerant, be sure to wear gloves. ...
