Kia Forte: Audio / Audio Unit
Specifications
| Specification |
| Audio Unit |
|
Items |
Specifications |
||
|
Model |
Audio |
Display audio |
|
|
Power supply |
DC 14.4V |
||
|
Rated power |
MAX. 45W X 4 |
||
|
Impedance |
4 Ω x 4 |
||
|
Antenna |
80PF 75Ω |
||
|
Tuning type |
PLL synthesized type |
||
|
Dark current |
MAX.1mA |
||
|
Frequency range / Channel separation |
FM |
87.5 - 108.0 MHz/100 KHz |
|
|
AM |
531 - 1602 KHz/9 KHz |
||
Components and components location
| Components |
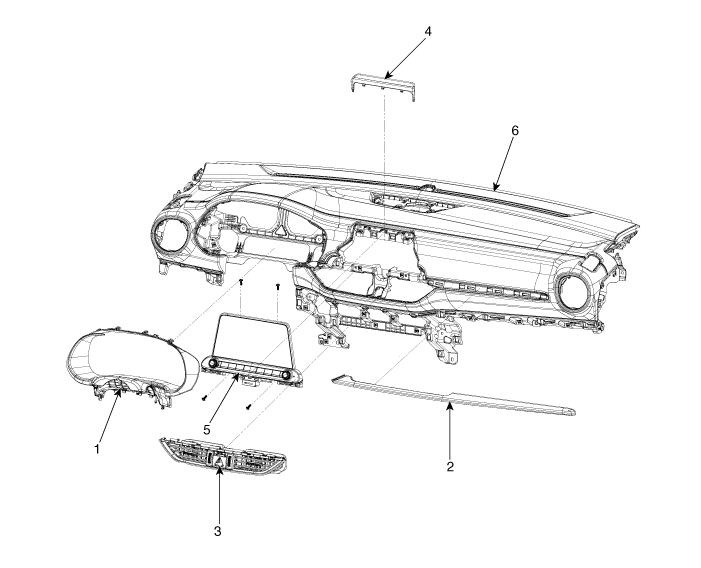
| 1. Cluster fascia panel 2. Crash pad center garnish 3. Center air vent duct assembly |
4. Audio upper panel 5. Audio head unit 6. Crash pad |
Schematic diagrams
| Connector and Terminal function |
| [Audio] |
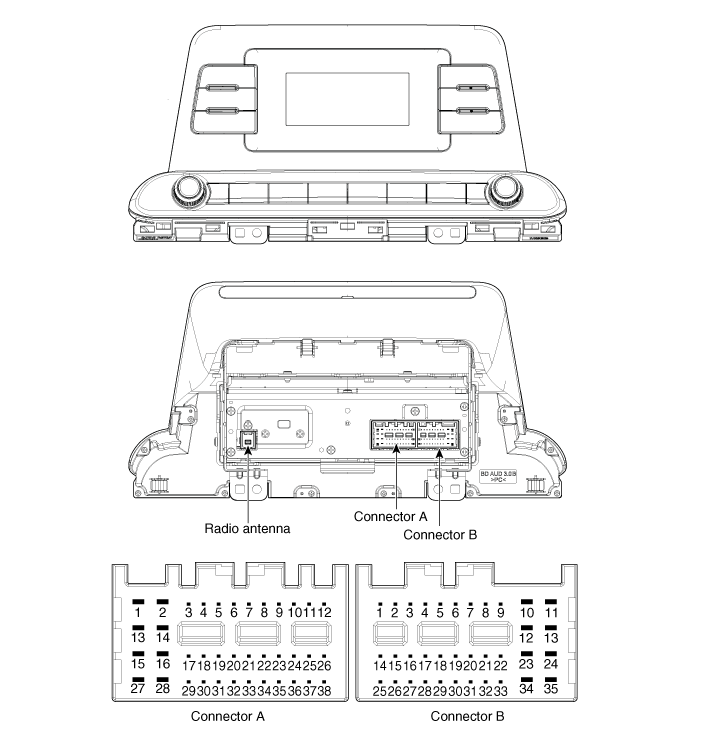
|
No. |
Connector A |
Connector B |
|
1 |
Rear door left speaker (+) |
- |
|
2 |
Rear door left speaker (-) |
MIC (+) |
|
3 |
USB ground |
- |
|
4 |
USB D (+) |
Detent |
|
5 |
USB D (-) |
Remote antenna |
|
6 |
USB B (+) |
Illumination (+) |
|
7 |
- |
- |
|
8 |
- |
- |
|
9 |
- |
- |
|
10 |
AUX Right input |
Battery (+) |
|
11 |
AUX Detect |
Battery (+) |
|
12 |
Steering wheel remote controller |
Ground |
|
13 |
Front door left speaker (+) |
Ground |
|
14 |
Front door left speaker (-) |
- |
|
15 |
Front door right speaker (-) |
MIC (-) |
|
16 |
Front door right speaker (+) |
- |
|
17 |
- |
- |
|
18 |
- |
Vehicle speed signal |
|
19 |
- |
Illumination (-) |
|
20 |
- |
- |
|
21 |
- |
- |
|
22 |
- |
ACC |
|
23 |
- |
- |
|
24 |
AUX Left input |
- |
|
25 |
AUX Ground |
- |
|
26 |
Steering wheel remote controller ground |
- |
|
27 |
Rear door right speaker (-) |
- |
|
28 |
Rear door right speaker (+) |
- |
|
29 |
- |
- |
|
30 |
- |
- |
|
31 |
- |
- |
|
32 |
- |
- |
|
33 |
- |
- |
|
34 |
- |
- |
|
35 |
- |
- |
|
36 |
- |
|
|
37 |
- |
|
|
38 |
- |

| [Display Audio] |
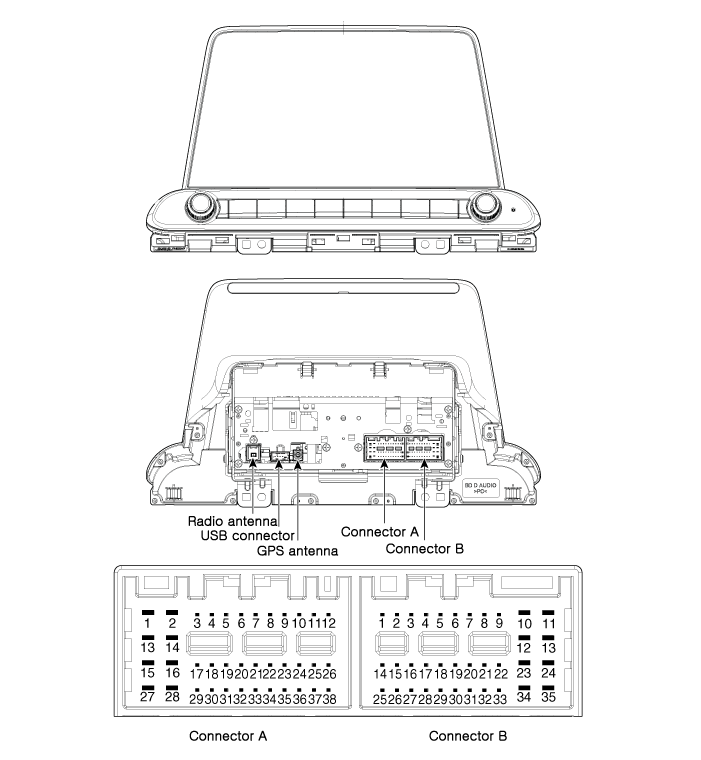
|
No. |
Connector A |
Connector B |
|
|
A built-in amplifier |
External amplifier |
||
|
1 |
Rear door left speaker (+) |
- |
- |
|
2 |
Rear door left speaker (-) |
- |
MIC (+) |
|
3 |
- |
Amplifier navigation voice (+) |
- |
|
4 |
- |
Amplifier_SPDIF (High) |
- |
|
5 |
- |
Antenna power |
|
|
6 |
RVM Camera power |
Illumination (+) |
|
|
7 |
RVM Camera video input |
M-CAN (High) |
|
|
8 |
- |
- |
|
|
9 |
- |
- |
|
|
10 |
AUX Jack audio right |
Battery (+) |
|
|
11 |
AUX Jack detect |
Battery (+) |
|
|
12 |
Steering wheel remote controller |
Ground |
|
|
13 |
Front door left speaker (+) |
- |
Ground |
|
14 |
Front door left speaker (-) |
- |
- |
|
15 |
Front door right speaker (-) |
- |
MIC (-) |
|
16 |
Front door right speaker (+) |
- |
- |
|
17 |
- |
Amplifier navigation voice (-) |
- |
|
18 |
- |
Amplifier_SPDIF (-) |
- |
|
19 |
- |
Amplifier_SPDIF (Ground) |
Illumination (-) |
|
20 |
RVM Camera power ground |
- |
|
|
21 |
RVM Camera video ground |
ACC |
|
|
22 |
- |
- |
|
|
23 |
- |
- |
|
|
24 |
AUX Audio left |
- |
|
|
25 |
AUX Audio ground |
- |
|
|
26 |
Steering wheel remote controller ground |
- |
|
|
27 |
Rear door right speaker (-) |
- |
- |
|
28 |
Rear door right speaker (+) |
- |
- |
|
29 |
- |
- |
|
|
30 |
- |
- |
|
|
31 |
- |
- |
|
|
32 |
- |
- |
|
|
33 |
- |
IGN1 |
|
|
34 |
- |
- |
|
|
35 |
- |
- |
|
|
36 |
- |
- |
|
|
37 |
- |
- |
|
|
38 |
Vehicle speed signal |
- |
|
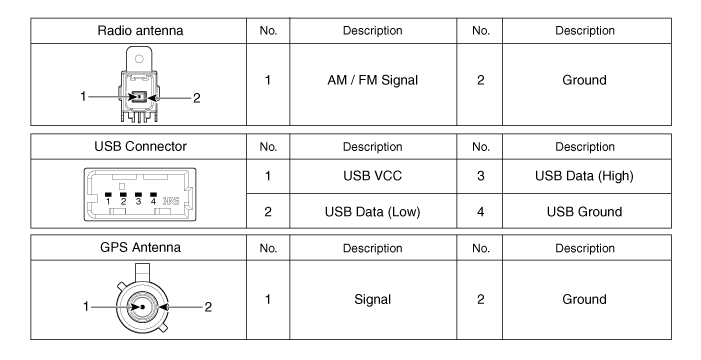
Repair procedures
| Removal |
|
| 1. |
Disconnect the negative (-) battery terminal. |
| 2. |
Remove the cluster fascia panel. (Refer to Body - "Cluster Fascia Panel") |
| 3. |
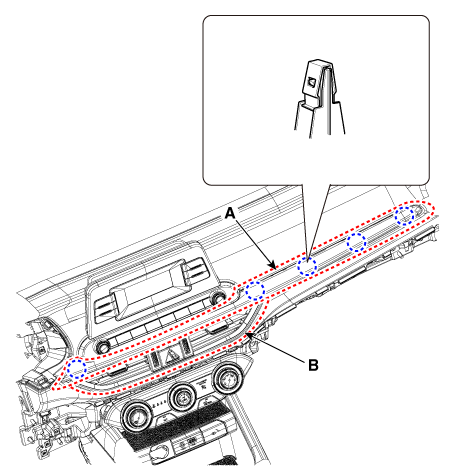
Remove the center air vent duct assembly (B) after removing the crash pad center garnish (A).
|
| 4. |
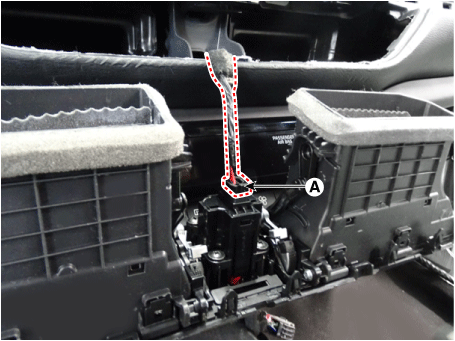
Disconnect the connector (A) from the center air vent duct assembly.
|
| 5. |
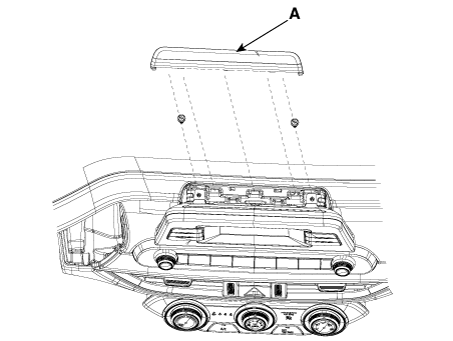
Loosen the screws after removing the audio upper panel (A).
|
| 6. |
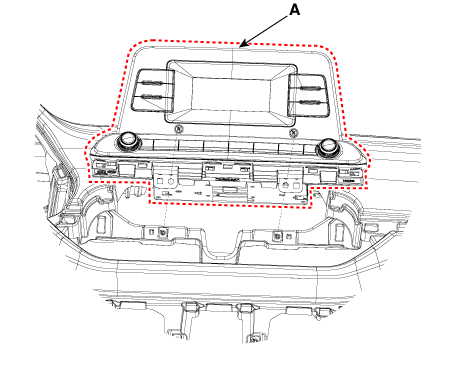
Remove the audio head unit (A) after loosening the screws.
|
| 7. |
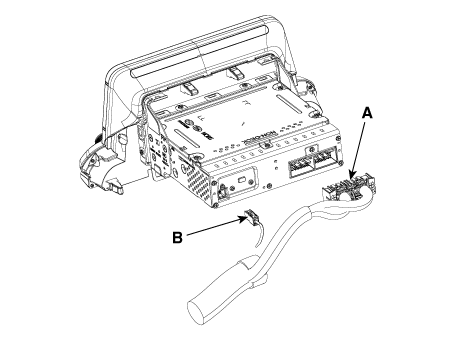
Disconnect the audio head unit connector (A) and Radio cable (B).
|
| Installation |
| 1. |
Install in the reverse order of removal. |
 Audio
Audio
Components and components location
Component Location
[4DR]
1. Audio head unit
2. Tweeter speaker
3. Glass antenna amplifier
4. Front door speaker
...
 Speakers
Components and components location
Components Location
1. Tweeter speaker
2. Front door speaker
3. Rear door speaker
4. Crash pad center speaker
5 ...
Other information:
Kia Forte 2019-2025 (BD) Service Manual: Emergency Call (E-Call) Unit
Schematic diagrams Connector and Terminal Function Repair procedures Removal E-Call Unit 1. Remove the main crash pad assembly. (Refer to Body - "Main Crash Pad Assembly") 2. Remove the E-Call unit (A) by loosen ...
Kia Forte 2019-2025 (BD) Owners Manual: Tilt and telescopic steering
Tilt steering allows you to adjust the steering wheel before you drive. You can also raise it to give your legs more room when you exit and enter the vehicle. The steering wheel should be positioned so that it is comfortable for you to drive, while permitting you to see the instrument ...


