Kia Forte: Interior features / Seat warmer
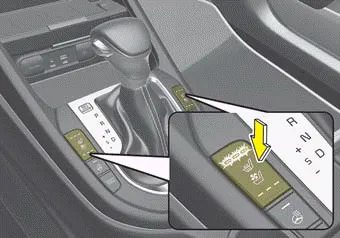
■ Front seat
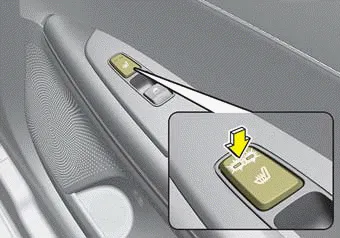
■ Rear seat
The seat warmer is provided to warm the front seats during cold weather. With the ignition switch in the ON position, push either of the switches to warm the driver's seat or the front passenger's seat.
During mild weather or under conditions where the operation of the seat warmer is not needed, keep the switches in the "OFF" position.
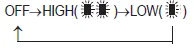
►Temperature control (Manual)
Each time you press the switch, the temperature setting of the seat will change as follows :
■ Front seat

■ Rear seat
• The seat warmer defaults to the OFF position whenever the ignition switch is turned on.
►Temperature control(Automatic)
The seat warmer starts to automatically control the seat temperature in order to prevent low-temperature burns after being manually turned ON.
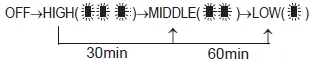
You may manually press the button to increase the seat temperature. However, it soon returns to the automatic mode again.
- When pressing the switch for more than 1.5 seconds with the seat warmer operating, the seat warmer will turn OFF.
- The seat warmer defaults to the OFF position whenever the Engine Start/Stop button is in the ON position.
✽ NOTICE
With the seat warmer switch in the ON position, the heating system in the seat turns off or on automatically depending on the seat temperature.
WARNING - Seat warmer burns
The seat warmer may cause burns, even at low temperatures, if used over a long period of time. Never allow passengers who may not be able to take care of themselves to be exposed to the risk of seat heater burns. These include:
1. Infants, children, elderly or disabled persons, or hospital outpatients
2. Persons with sensitive skin or those that burn easily
3. Fatigued individuals
4. Intoxicated individuals
5. Individuals taking medication that can cause drowsiness or sleepiness (sleeping pills, cold tablets, etc.)
WARNING - Hot liquids Do not place uncovered cups with hot liquid in the cup holder while the vehicle is in motion. If the hot liquid spills, you may burn yourself.
The temperature setting of the seat changes according to the switch position. If you want to ventilate your seat cushion, press the switch (blue color).
Other information:
Kia Forte 2019-2024 (BD) Owner's Manual: Climate control air filter
Filter inspection The climate control air filter should be replaced according to the Maintenance Schedule. If the vehicle is operated in severely air-polluted cities or on dusty rough roads for a long period, it should be inspected more frequently and replaced earlier.
Kia Forte 2019-2024 (BD) Owner's Manual: Tire sidewall labeling
This information identifies and describes the fundamental characteristics of the tire and also provides the tire identification number (TIN) for safety standard certification. The TIN can be used to identify the tire in case of a recall.
Categories
- Manuals Home
- Kia Forte Owners Manual
- Engine oil
- Fuses
- What to do in an emergency
- New on site
- Most important about car
