Kia Forte: Alternator / Battery Sensor
Description and operation
| Description |
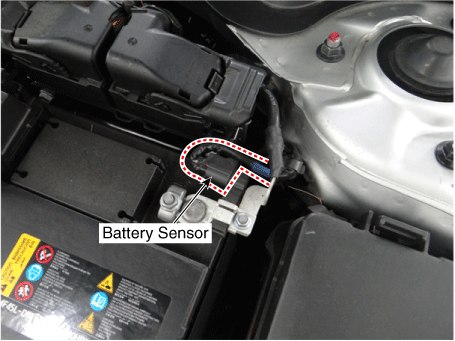
Vehicles have many control units that use more electricity. These units control their own system based on information from diverse sensors. It is important to have a stable power supply as there diverse sensors giving a variety of information. Battery sensor (A) is mounted on battery (-) terminal. It transmits battery voltage, current, temperature information to ECM. ECM controls generating voltage by duty cycle based on these signals.
Repair procedures
| Removal and Installation |
| 1. |
Turn the ignition switch OFF. |
| 2. |
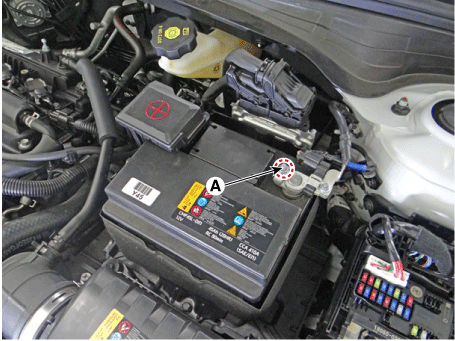
Disconnect the battery negative (-) terminal (A).
|
| 3. |
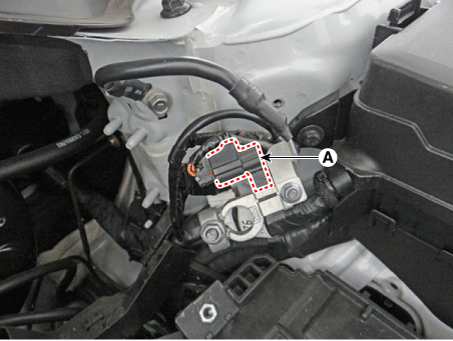
Disconnect the battery sensor connector (A).
|
| 4. |
Remove the battery sensor by loosening the mounting bolt (A).
|

| 5. |
Install in the reverse order of removal.
|

| Battery Sensor Recalibration Procedure |
After reconnecting the battery negative cable, AMS function does not operates until the system is stabilized, about 4 hours. If disconnecting the negative (-) battery cable from the battery during repair work for the vehicle equipped with AMS function, Battery sensor recalibration procedure should be performed after finishing the repair work.
| 1. |
Turn the Iginition switch ON and OFF. |
| 2. |
Park the vehicle for about 4 hours with the hood and all doors closed. |
 Battery
Specifications
Specification
▷CMF60L - DIN
Item
Specification
Capacity [20 hr / 5 hr] (AH)
60 / 48
Cold Crank ...
 Ignition System
Description and operation
Description
Ignition timing is controlled by the electronic control ignition timing system.
The standard reference ignition timing data for the engine operat ...
Other information:
Kia Forte 2019-2025 (BD) Owners Manual: Air cleaner
Filter replacement The air filter must be replaced when necessary, and should not be washed. While inspecting the air cleaner compartment, the air filter can be cleaned using compressed air. 1. Loosen the air cleaner cover attaching clips and open the cover. 2. Wipe the inside of ...
Kia Forte 2019-2025 (BD) Service Manual: ETC (Electronic Throttle Control) System
Specifications Specification Throttle angle(°) Output Voltage (V) TPS1 TPS2 0 0.5 4.5 10 0.96 4.05 20 1.41 ...
